Sunday, October 9, 2016
Notes for next year
Just had a nice weekend visit with Dick and Barb K. They had some amazing yellow cherry tomatoes that I think maybe we should try next year: Sun Sugar.
Sunday, October 2, 2016
When to prune or trim in Zone 5b or 6
http://www.midwestgardentips.com/garden_calendars.html
FALL:
Columbine
Remove any foliage showing leaf miner damage and remove any debris around the base of the plants. Aquilegia send out growth early in spring and appreciate not having the old foliage to contend with.
Remove any foliage showing leaf miner damage and remove any debris around the base of the plants. Aquilegia send out growth early in spring and appreciate not having the old foliage to contend with.
Peony
Peonies need a period of cold to set buds for the following season. That coupled with the fact that their foliage is extremely prone to mildew is reason enough to remove the foliage in the fall. Infected foliage can be removed and disposed of in late summer. Healthy foliage will turn golden in fall and can be removed once it has turned to mush, after the first frost.
Iris
Catmint
WINTER:
Deciduous Trees (Oaks, Aspen) - late winter
Evergreen Trees (Juniper, Pinon, Cedar) - winter
Avoid heavy pruning in the spring while a plant’s leaves are expanding. If a little light pruning is necessary at this time, go ahead and prune away, but this isn’t the time for drastic pruning.
Dead limbs and branches may be pruned off at any time. If you’re unsure whether or not a branch is truly dead, scratch the bark with a fingernail. A living branch will appear green beneath the bark.
Arborvitae - Prune anytime from late summer through late winter
Juniper - Prune late fall through late winter, while dormant
SPRING:
Roses - When the forsythia blooms (but I don't HAVE any forsythia!!!)
Wait until they have begun to actively grow. If the leaf buds/nodes have not begun to fatten up and grow it's a little early yet. If they are already starting to grow then go ahead and prune them. Start at the top of each cane and cut off about 2 inches. Look at the center of the cane. Is it white/green or tan/brown? White/green is live cane. Tan /brown is dead wood. Keep cutting down about 2 inches at a time just above an outward facing leaf bud until you get to cane that has a clear, clean white/green center.
Chrysanthemums
Leave the foliage intact to protect the plant’s crown.
Honeysuckle
Chrysanthemums
Leave the foliage intact to protect the plant’s crown.
Honeysuckle
Prune in early spring while dormant
Artemisia (sagebrush, fluffy light green stuff)
Lavender Cotton
Don’t prune at all after mid-August and wait until new growth appears in the spring before pruning.
Lilacs
Artemisia (sagebrush, fluffy light green stuff)
Lavender Cotton
Don’t prune at all after mid-August and wait until new growth appears in the spring before pruning.
Lilacs
- Late spring to early summer, after blooming. Wait for the flowers to die off. Use hand pruners to clip away the dried blooms just above the last set of leaves below the flower
- Look over the bush for old limbs that appear brittle or don't have leaves or flowers on them. Clip off these branches using your hand pruners, or garden loppers if the branch is thick, as far down as you can reach, cutting the branch at ground level if possible.
- Cut back misshapen branches or smaller limbs that rub against a stronger limb where they originate or branch off from a larger branch.
- Thin weaker branches of the lilac bush at ground level to leave behind at least three to five strong stalks on the bush to keep it healthy. These branches are already working on next year's flowers.
- Maintain your lilac by deadheading the spent flowers each year, but allow three to five years to pass before pruning again. With each pruning after the initial pruning, try to remove a third of the plant, starting with the oldest stalks.
- Don't cut plants like lavender to the ground, and don't touch them in fall or winter
- Lavender plants should be pruned once per year, preferably in the spring, just before new growth starts. Use hedge trimmers or pruning shears, if possible, to keep things nice and tidy. Prune back about 1/3 of the new growth each time, shaping the lavender bush into a nice mound shape. Pruning lavender any more than 1/3 off the top may cause it to wither and die, so use caution. It’s better to prune too little than to prune too much. Do not cut all of the new growth down to the stems, as lavender may not survive this type of heavy pruning.
- Pruning Old Lavender Plants: Pruning lavender plants that are beyond three years old, or of an indeterminate age, and have never been pruned before is a little trickier. Older lavender plants will not survive heavy pruning, especially if there is more woody growth than new, green growth. If there is new growth visible above the woody stalks, begin by pruning back as much of as possible above the woody areas, without actually cutting into them. This is best performed in the summer time, and only once per year. This technique for pruning lavender will encourage new growth along the entire stem, and may eventually result in a plant that can be reshaped.
Tuesday, September 13, 2016
Tomato Update
I'm beginning to think the tomatoes are over-crowded. Gotta remember to space them out a lot more next year, if I can keep Bob from buying out all the bedding plants in the store!
Also, those sickly plants on the south end of the shed appear to be cherry tomatoes, and NOT the same as the ones on the west. They never really looked the same. I need to be much more careful about labeling. We got a handful of cherry tomatoes today - enough for a couple salads - and there are actually green tomatoes on several of the other plants. Also, green tomatoes on the two I planted in the south flower bed. We might get to eat at least one ripe tomato from all those plants!
Also, those sickly plants on the south end of the shed appear to be cherry tomatoes, and NOT the same as the ones on the west. They never really looked the same. I need to be much more careful about labeling. We got a handful of cherry tomatoes today - enough for a couple salads - and there are actually green tomatoes on several of the other plants. Also, green tomatoes on the two I planted in the south flower bed. We might get to eat at least one ripe tomato from all those plants!
Saturday, August 27, 2016
Lavender Cuttings
I've decided I'd better try to start some lavender from cuttings, in case dividing the big plan doesn't work out well. I have three going - we'll see what happens. They've been in pots two or three days. I'll check for roots in a couple of weeks.

Here are some good instructions from Gardening Know How:
Taking Cuttings from Lavender Regardless of the type of cutting, you should always cut healthy, straight, vigorous stems for rooting. Choose stems with good color and no buds. Use a sharp knife to take a hardwood or softwood cutting measuring 3 to 4 inches long. Cut hardwood stems just below a bump that indicates a leaf node. Remove all of the leaves from the lower 2 inches of the stem and then gently scrape the skin off the bottom portion of the stem on one side with a knife. Set the cutting aside while you prepare the container. Fill a small pot with commercial starting medium or a homemade mix of half vermiculite or perlite and half peat moss, with a little bark added to facilitate drainage. Dip the stripped tip of the cutting in rooting hormone, if desired. Rooting hormone helps prevent the tip from rotting and encourages quick, strong root development, but lavender roots well without it. Stick the lower end of the cutting about 2 inches into the soil and firm the soil so that the cutting stands up straight. Cover with plastic to form a greenhouse-like environment for the cuttings. Lavender Cuttings Care Softwood cuttings from lavender root in two to four weeks, and hardwood cuttings take a little longer. Check to see if the stems have roots by giving them a gentle tug. If you feel resistance, the stem has roots holding it in place. Wait several days between tugs as you can damage tender, young roots by tugging on them too often. Remove the plastic bag when the cutting has roots. Set the new plant in a sunny location and water it when the soil is dry an inch or so below the surface. Feed the plant with one-quarter strength liquid plant fertilizer once a week. If you plan to keep the plant in a pot for more than two or three weeks, transplant it into a larger pot with regular potting soil that drains freely. Commercial potting soils have plenty of nutrients to maintain the plants without supplemental feedings. Propagation of lavender from cuttings is easy and more likely to be successful than growing the plants from seeds. With cuttings, you can rest assured that your new plants will be exactly like the parent plants.
Gardening Know How: Propagation Of Lavender: Tips For Rooting Cuttings From Lavender http://www.gardeningknowhow.com/edible/herbs/lavender/rooting-lavender-cuttings.htm
Tuesday, August 16, 2016
Tomatoes - August 16th
I'm noticing a difference in the way the tomato plants look in different parts of the garden:


vs.


These are all from the same 6-packs (don't know what type they were - can't find the tags), but the ones on the right side as we come in the door are much more lush with larger leaves than the ones in the bed at the end of the U. Perhaps the big ones are getting more sun, as the end of the U is often in the shade of the tree at the corner of the shed. Something to think about next year.


These are the ones on the far side of the shed (Champion II). They appear to be doing well, but not much fruit showing yet. The leaves are always curled up, even when they're not dry. I guess it's just the type of plant! They're supposed to be more disease-resistant than other tomatoes, so maybe that's why.
Here are some of the varieties we put in the buckets. We definitely need to use different soil in the buckets next year.


 These (Heat Wave) are quite tall, and have fruit on them already, where the others don't.

 This one (Celebrity) isn't really doing much yet.

 It doesn't seem like Early Girl is doing much, either.
 This is Super Sweet 100 - cherry tomatoes. Some fruit, seems to be doing OK. But the plants in the buckets aren't as full and dark green as the ones in the beds. Probably the dirt.


vs.


These are all from the same 6-packs (don't know what type they were - can't find the tags), but the ones on the right side as we come in the door are much more lush with larger leaves than the ones in the bed at the end of the U. Perhaps the big ones are getting more sun, as the end of the U is often in the shade of the tree at the corner of the shed. Something to think about next year.


These are the ones on the far side of the shed (Champion II). They appear to be doing well, but not much fruit showing yet. The leaves are always curled up, even when they're not dry. I guess it's just the type of plant! They're supposed to be more disease-resistant than other tomatoes, so maybe that's why.
Here are some of the varieties we put in the buckets. We definitely need to use different soil in the buckets next year.


 These (Heat Wave) are quite tall, and have fruit on them already, where the others don't.
 This one (Celebrity) isn't really doing much yet.
 It doesn't seem like Early Girl is doing much, either.
 This is Super Sweet 100 - cherry tomatoes. Some fruit, seems to be doing OK. But the plants in the buckets aren't as full and dark green as the ones in the beds. Probably the dirt.
Saturday, August 6, 2016
Dividing Lavender
Well, I may have really goofed! Yesterday I decided to divide my oldest lavender plant. It was planted near the yucca, and didn't have much room. It was getting pretty big and woody, and didn't produce many flowers, so it seemed sensible to just move it.
I did. I dug into it, removed a couple pieces, and put them into the southern front flower bed. Then I took the rest, broke it into two big chunks, and put those in the new bed by the pampas grass.
Today I read an article that said only divide your lavender plant as a LAST RESORT! Apparently there is a high probability of death after division. Rats.... I guess I'll just have to wait and see what happens. I still have the one next to the front steps, so if the older one kicks the bucket maybe I can propagate more plants from cuttings.
I wonder if I'll ever think to look things up BEFORE I do them.
Sunday, July 31, 2016
Flower Bed Update - Summer 2016
 |
| I just figured out what that flower between the Russian sage plants is. Jupiter's Beard (red valerian). |


Tomatoes - Determinate or Indeterminate?
Every year we just guess when we pick out tomatoes. Why didn't I write down the kind we had last year? They were terrific, and I have no clue what they were. So THIS year I have good intentions...
First of all, I had to look up the difference between Determinate and Indeterminate tomato plants. Apparently determinate plants are more compact and bear a crop over a short period of time. Indeterminate plants bear fruit all season long. They grow larger and need to be staked or caged for support.
So, I think we want to grow INDETERMINATE varieties from now on. We can always buy a couple boxes of locally-grown tomatoes if we want to can them, and just enjoy eating our garden tomatoes all season long.
One of the varieties we planted this year was Champion II. It's an indeterminate variety that is bred to be disease-resistant and to provide medium-sized solid meaty fruit.

Monday, May 2, 2016
Spring 2016
I've ignored this poor little blog, and now when I need information, it's not here! So I'd better start keeping up with my gardening here so I can come back later.
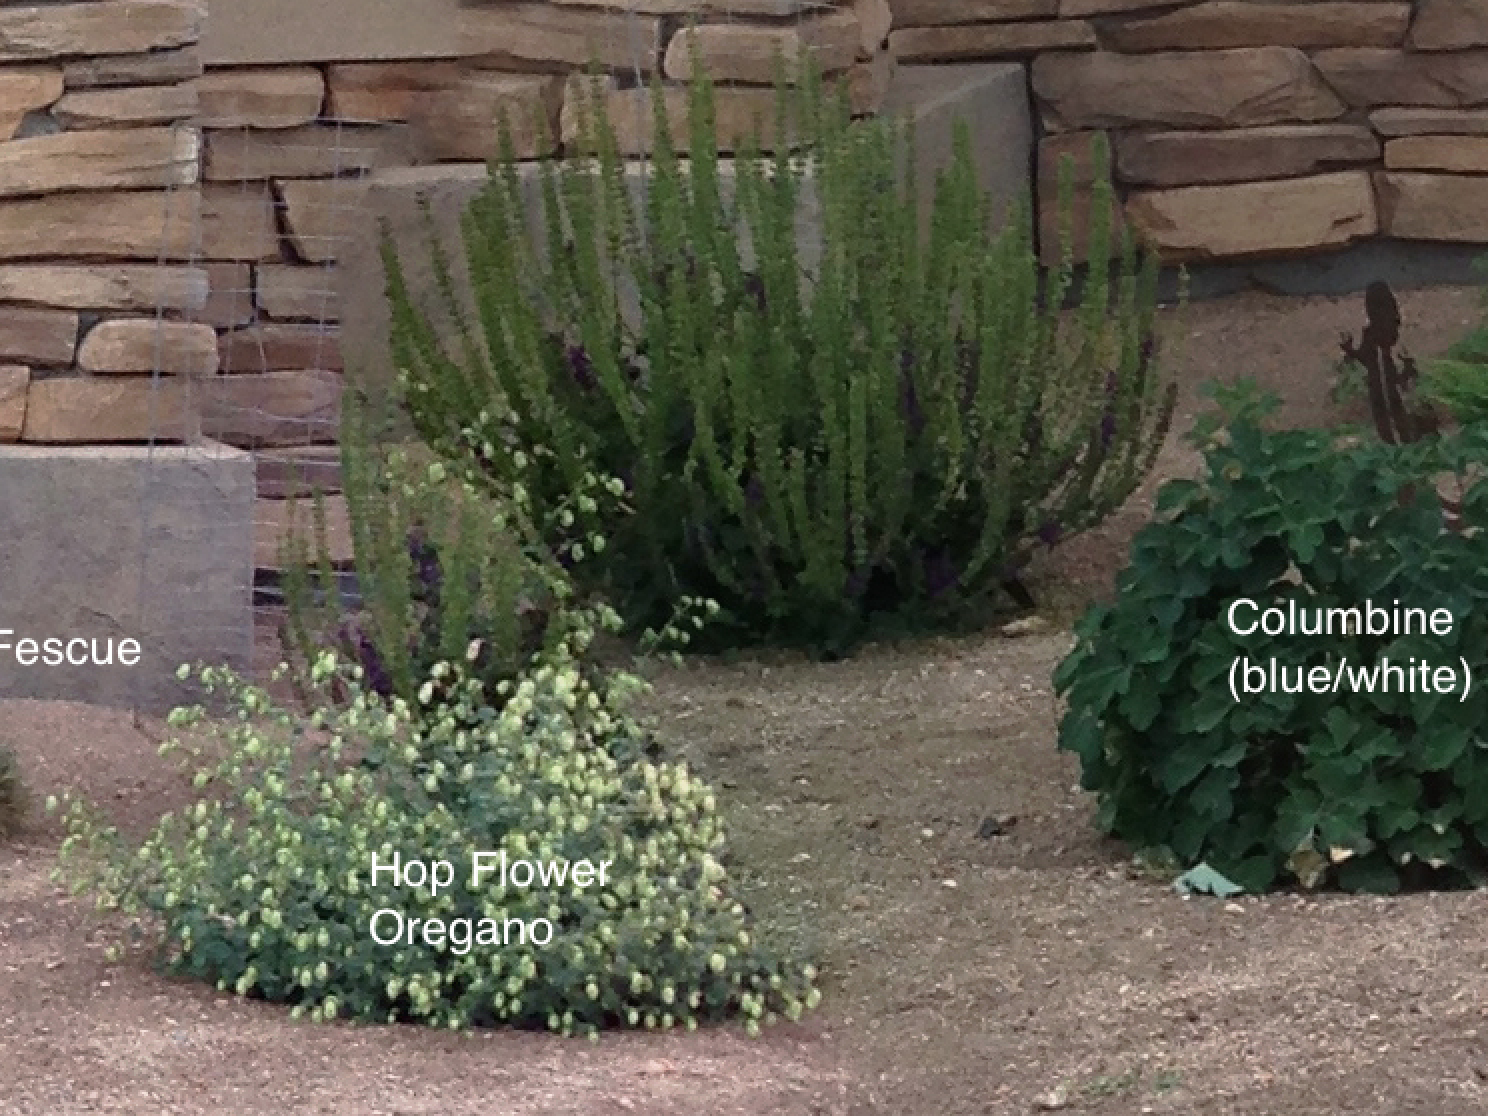
First...I want to paint the names of my herbs on stones to use as markers in the beds. But to do that I guess I kind of need to know what herbs I have.

So this is a panorama I put together at one point, with labels...but it's so small I can't read the labels. Back to the photo editor and camera, I guess.
Summer 2016 NOTE: I moved the cat mint across the drive, over by the pampas grass, because it was getting so big it started killing the creeping juniper. The tricolor sage and chrysanthemums are dead. I moved the blue fescue to the front of the bed, but the rabbits eat it down to the ground. I'm trying to move the juniper thyme to the front of the bed, as it doesn't look too good where it is now. Also, the red/yellow columbine is over by the garage now.


Obviously, things have changed since I first planted these and took the pictures. But this might give me some ideas of what things are when they start coming up again.
First...I want to paint the names of my herbs on stones to use as markers in the beds. But to do that I guess I kind of need to know what herbs I have.
So this is a panorama I put together at one point, with labels...but it's so small I can't read the labels. Back to the photo editor and camera, I guess.
Summer 2016 NOTE: I moved the cat mint across the drive, over by the pampas grass, because it was getting so big it started killing the creeping juniper. The tricolor sage and chrysanthemums are dead. I moved the blue fescue to the front of the bed, but the rabbits eat it down to the ground. I'm trying to move the juniper thyme to the front of the bed, as it doesn't look too good where it is now. Also, the red/yellow columbine is over by the garage now.


Obviously, things have changed since I first planted these and took the pictures. But this might give me some ideas of what things are when they start coming up again.
Subscribe to:
Posts (Atom)